The behavior of internal markers in Ti-6Al-4V deformed in superplastic tension
- PDF / 204,871 Bytes
- 2 Pages / 612 x 792 pts (letter) Page_size
- 23 Downloads / 264 Views
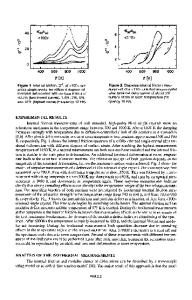
Fig. 1—The stress-strain behavior of the specimen stretched to a strain of 1.0, together with values of the rate sensitivity index, m, determined from the upper and lower bounding curves (indicated by broken lines) interpolating alternating stages of deformation at rates 10 pct higher and 10 pct lower than the nominal rate of 1024 s21.
glaze to minimize the uptake of atmospheric elements. Extensions to strains of 0.4 and 1.0 were made at a strain rate of 1024 s21. The strain rate was actually switched between values of 0.9 3 1024 s21 and 1.1 3 1024 s21, with strain periods of 0.025 at each rate, to allow the strain rate sensitivity to be measured. For all strain and strain rate calculations, it was assumed that the gage section remained parallel. This proved to be a reasonable assumption in the present case, and the lateral strains in the width and thickness directions were nearly equal. The stress-strain result for the higher elongation test is shown in Figure 1. The strain rate sensitivity values, m, given by m 5 D ln s /D ln εz increased somewhat with strain, to values significantly greater than 0.6, and were always greater than 0.5. The grain size was determined as mean linear intercepts, using any noticeable colony boundary in the transformed b as well as a-b and a-a boundaries. This mean intercept increased with deformation from an initial value of 5.9 to 9.0 mm after a strain of 1.0. The internal marker particles developed into small voids at the test temperature, even in the absence of deformation. Examples of the internal markers present in the undeformed head as well as the gage section of the specimen stretched to a strain of 1.0 are shown in Figure 2. In all cases, there was very little deviation of individual marker points from a planar alignment. The deviation shown in Figure 2(b) is a maximum of about 5 mm, and most of the cavities were aligned without any significant deviation at all. Small deviations from linearity of the markers after deformation would be expected in any case, due to differences in local flow stresses and grain orientations. The experimental observations are not consistent, in our view, with grain boundary sliding having made any significant contribution to the deformation in the tensile tests. In most conceivable circumstances, noticeable disruption of the planar alignment would be expected if grain boundary VOLUME 27A, NOVEMBER 1996—3747
(a)
sliding had occurred. Circumstances where the planar alignment would not be disrupted are where the Ashby–Verrall[4] type of grain switching event occurred homogeneously throughout the structure, and where homogeneous slip along essentially parallel bands of single grain thickness occurred. In both of those cases, the critical and unlikely feature is the homogeneity of the operation of the mechanism through the material volume. If there is any inhomogeneity in the grain translation, the marker alignment would be disrupted at relatively small strains, and simple physical simulations involving, say, a sufficiently large packed array of coi
Data Loading...


