The effect of a tin barrier layer on the permeability of hydrogen through mild steel and ferritic stainless steel
- PDF / 309,702 Bytes
- 3 Pages / 594 x 774 pts Page_size
- 13 Downloads / 342 Views
J. BOWKER is a Research Scientist, PMRL, Canmet, 568 Booth Street, Ottawa, ON K1A 0GI, Canada. G.R. PIERCY, Professor, is with the Department of Metallurgy and Materials Science, McMaster University, Hamilton, ON L8S 4M1, Canada. Manuscript submitted May 8, 1984. METALLURGICALTRANSACTIONS A
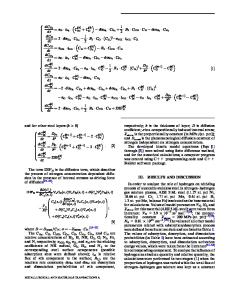
system was sealed at each surface of the sample using a modified standard vacuum flange. To avoid problems of degassing during testing, the vacuum system was initially evacuated to 10 -9 atmospheres, and pumping was continued as the sample was heated to the highest temperature at which measurements were made. After eight hours at this temperature, hydrogen was admitted and maintained at one atmosphere pressure at the "entrance" side of the sample. The pumping current from the "exit" side of the sample was monitored until steady state was achieved. The temperature was then lowered one increment and vac-ion current monitored until the new steady state was achieved. Measurements were made after successive temperature drops of one increment until the flow rate reached the sensitivity limit caused by the system's leak rate. Measurements were then made after incremental raises in temperature to the original highest value. Comparison of the results for the same temperature in the initial downward and final upward increments ensured there were no microstructural effects producing a systematic change in the sequence of measurements. The permeability was calculated from the usual equation: 6 = JL/AN/-~ where J is the steady-state flow of hydrogen through the sample, L is the sample thickness, A = 14.5 cm 2 is the sample area, and P = 1 atm is the hydrogen pressure on the entrance side of the sample. Samples used in these high temperature tests were examined after the test, using the optical microscope, X-ray diffraction, and the scanning electron microscope fitted with a Kevex X-ray analyzer. This checked the change in the Pd and Sn layer, if any, that occurred during the test. Because the measurements were reproducible at each temperature, all changes were assumed to be complete after the initial prebake at the highest temperature. Thus, the surface film actually present during the permeability measurements was that described in the SEM results. Figure 1 shows the measured values for the permeability of hydrogen in iron and ferritic stainless steel. The top dashed line shows the curve of Quick and Johnson 3 for iron. The error bars indicate the two values measured in ferritic stainless steel and the standard deviation of the six measurements (two at each of three different thicknesses) for iron. The permeability in ferritic stainless steel between 523 and 673 K can be represented as ~b = 4.1 x 10¹⁷ e x p ( - 10,800/RT) hydrogen atoms per cm 9 s 9 aV~--mm. Figure 2 shows the measured values for the permeability of hydrogen through the "tin" layer on mild steel and on stainless steel. The curve marked Sn is for the 0.18/~m layer on mild steel. In order to minimize the interdiffusion of tin and iron, the initial evacuation was at 673 K for
Data Loading...


