Crack closure load measurements for microcracks developed during the fatigue of Al 2219-T851
- PDF / 811,335 Bytes
- 5 Pages / 612 x 792 pts (letter) Page_size
- 22 Downloads / 289 Views
The
r e c e n t use of c r a c k closure load information to express fatigue propagation rate data in t e r m s of an effective r a t h e r than an absolute s t r e s s intensity r a n g e has been useful in explaining s e v e r a l environmental and loading history effects on c r a c k propagation, particularly in aluminum alloys.~-2 Such effects have heretofore been studied only for m a c r o c r a c k development in fracture mechanics type specim e n s .1-13 Reported here is a study of the c r a c k closure loads developed in the e a r l y s t a g e of m i c r o c r a c k propagation in A1 2219-T851. Of particular interest to this study are the relationships a m o n g the relative humidity in which the alloy is fatigued, the c r a c k path as influenced by the alloy microstructure, and the resulting closure load. A r e c e n t investigation of the e a r l y s t a g e of fatigue c r a c k propagation in A1 2048 (Ref. 14) has shown that microcracks propagated in that alloy in a R = - 1 test condition are not completely closed at zero load. Furthermore, it is noted that the amount of residual opening is sensitive t o both the details of interaction of the propagating c r a c k with the alloy microstructure and the r e l a tive humidity in which the c r a c k was propagated. A further goal of the present study is t o r e l a t e such residual openings t o measured c r a c k closure load for A1 2219 as a function of test humidity. This will permit the c r a c k closure load of a given microcrack to be estimated, solely from measured c r a c k geom e t r i c parameters. Ultimately the c r a c k closure load developed by propagating microcracks as effected by environment and alloy microstructure must be understood before microcrack propagation rate and behavior can be predicted quantitatively.
W. L. MORRIS and O. BUCKare Member ofTechnical Staff and Group Leader, Fractureand Metals Physics Group, respectively, Science Center, Rockwell International Corporation, Thousand Oaks, CA91360. Manuscript submitted June 22, 1976. METALLURGICAL TRANSACTIONS A
SPECM I EN GEOMETRY ,,,--,,
"~
SIDEVIEW
~~
'50 umTHICK MYLAR
0
I l,L m
2cm
I_ l-
TOPVIEW
LOAD
I
@
,
"
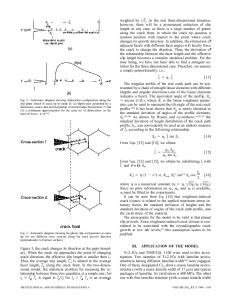
USEFUL SU Fig. 1--Schematic of specimen geometry. Measurements are made only in a limited central region of the specimen to avoid localized zones of stress intensitification. E X P E R I M E N T A L T h e s p e c i m e n s of A I 2 2 1 9 - T 8 5 1 w e r e f a t i g u e d in f l e x u r e f o r R = ( ~ m i n / ( ~ m a x = - 1 in s t r o k e c o n t r o l for
5 kc at 0.3 H z . Specimen geometry was configured in the standard triangular shaped pattern to provide a constant s t r e s s over the active r e g i o n of the test specimen (Fig. 1). The specimens were taken from plate stock of heat of A1 2219-T851 whose fatigue lifetime properties as effected by humidity had previously been characterized. (Heat number two in Ref. 15). The m a t e r i a l composition is 6.3Cu-0.3Mn-balance VOLUME 8A, APRIL 1977 597
A1, and has an a v e r a g e transverse g r a i n
Data Loading...


