Surface relief produced by diffusion induced boundary migration in Cu-Zn
- PDF / 2,581,416 Bytes
- 5 Pages / 594 x 774 pts Page_size
- 8 Downloads / 253 Views
I.
INTRODUCTION
DURINGdiffusion
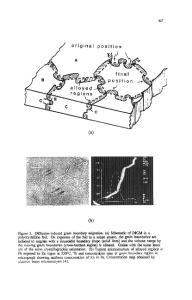
induced grain boundary migration (DIGM) in a metal exposed to a solute-vapor, an alloyed volume is formed behind the migrating boundary. As has been discussed by Shewmon,Z the lattice parameter changes caused by alloying, combined with differential mass transport due to the disparate diffusional fluxes, can be expected to give rise to dimensional changes and surface relief. Surface relief, produced in copper foils exposed to zinc vapor, has been examined in the hope that a further insight into the nature of the processes might be gained. Studies of diffusion induced boundary migration in the Cu-Zn systemz'3 have usually used experimental techniques in which the samples are polished and etched4 before being examined. In the present study, it has been found that the boundary movements can be recognized by optical and scanning electron microscopy, when the samples are examined immediately after exposure to the vapor. Migration of a boundary is detectable because its final position is marked by a groove or step, and the surface swept by the boundary is topographically changed. These changes include surface pitting and parallel corrugations. In this article, observations of the surface topography are described. The description is augmented by data obtained from measurements of composition and crystallographic orientations.
II.
EXPERIMENTAL PROCEDURE
Oxygen-free copper foil, approximately 50/xm thick, was electropolished in a mixture of H3PO4 and water (825 : 175). After washing and drying, it was recrystallized for 24 hours at 800 ~ in a flowing mixture of H2 in N2. Following this treatment, the grain boundaries extended entirely through the thickness of the foil, and their positions at the surfaces were clearly marked by thermal grooves. Samples of the recrystallized foil were encapsulated, in company with foil of a Cu-15 pct Zn alloy, in pyrex tubes. During the encapsulation process the tubes were repeatedly Y.S. TSAI, Graduate Research Associate, G. MEYRICK, Professor, and P. G. SHEWMON, Professor and Chairman, are all with the Department of Metallurgical Engineering, The Ohio State University, 116 West 19th Avenue, Columbus, OH 43210. Manuscript submitted August 11, 1983. METALLURGICALTRANSACTIONS A
evacuated and back-filled with hydrogen before being finally sealed under a small pressure of hydrogen. The encapsulated samples were diffusion-annealed at 400 ~ for various times and then immediately examined optically and in a JEOL scanning electron microscope equipped with a 9100 EDAX system. Some observations were also made in a JEOL STEM, in which crystallographic orientation measurements were effected by means of electron channeling patterns. III.
RESULTS
In the upper left corner of Figure 1 is a typical optical micrograph of a sample that had been annealed at 400 ~ for 48 hours. In this figure the original positions of the grain boundaries are depicted by the relatively dark, continuous lines caused by the thermal grooves remaining from the recrystallization treatment. The
Data Loading...


